Who can benefit from SoniClear Transcriber 10? Since launching Transcriber 10, many of our...
How to turn SoniClear recordings into minutes and transcripts
Since launching Transcriber 10, many of our customers have discovered how this new transcription tool has helped them streamline their processes for creating meeting minutes and verbatim transcripts.
To demonstrate how easy it is to unlock the power of accurate transcription with Transcriber 10, we've outlined the essential steps below for transforming your audio recordings into clear, accurate text. Our team at SoniClear is excited to help you. If you need any assistance, be sure to contact us.
Overview
All SoniClear products include a feature to transcribe recordings using the SoniClear Cloud transcription service. You can upload your recording to the service and automatically receive back an impressively accurate verbatim transcription and a summary of the text for use in publishing meeting minutes or other application specific summaries.
Steps to Submit a Recording for Transcription
1. Open the File
Open the audio file you want to transcribe in Transcriber10.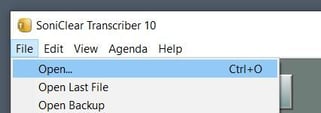
2. Start the Transcription Process
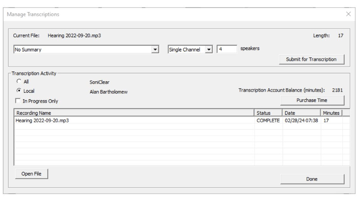
Select File > Manage Transcriptions from the pull-down menu

3. Configure Transcription Settings
Choose a Summary Method
The default Summary Method setting is No Summary. This field allows you to select a template that specifies what type of automatic summary you want to included with the transcript. There are a variety of built-in options for meetings and legal applications. In addition, SoniClear can create custom templates for specialized types of recordings. Regardless of summary method, a verbatim draft transcript will be returned from the transcription process.

Choose Channel Settings
-
- Single Channel:
- This is the default and correct setting for most situations.
- Enter the approximate number of people who speak on the recording (default: 4).
- Two Channel:
- This is a specialized setting for recordings where there are two people speaking and their voices are acoustically isolated on the left and right channel.
- Single Channel:
4. Upload to Start the Transcription Process
Click "Submit for Transcription"
Your recording will be uploaded to the SoniClear Cloud transcription server and processed. You must be connected to the Internet for the upload to be successful.

5. Wait for Transcription to Complete in Minutes or Check Back Later
The activity section of this dialog shows recordings the status of transcription jobs. You can stay in this screen while waiting for a transcript to be completed. Alternatively, you can close the Manage Transcriptions dialog and return to this screen at any time to retrieve you transcription when it is convenient.
Transcription Activity

The Transcription Activity settings allow you to customize which types of transcription jobs you want to see.
- Selecting "All" will show recordings from this computer and any other computer that has uploaded recordings to this account.
- Selecting "Local" will show only recordings uploaded from this computer.
- Checking the "In Progress Only" option will limit the display to recordings that have not yet completed being transcribed.
- The default is Local, with "In Progress Only" unchecked. This will display just the recordings that have been uploaded from this computer, both finished and jobs still being processed.
"Working" Transcription Status
Transcriptions typically take about five minutes to be completed. While your transcription is being processed you will see the job listed on this screen, along with the status of "WORKING".

"Transcribed" Transcription Status
The status will change to "TRANSCRIBED" when the transcription is completed and ready to download.

6. Download the Transcription to Your Computer
There are three options for downloading the transcript into the recording on your computer:
- If you stay in the Manage Transcriptions dialog after uploading a recording, you can click Done when the status is “Transcribed”.
- You can return later to to Manage Transcriptions dialog to see the status and download the transcript by double clicking on it or selecting it and clicking Open File.
- If you have the file open in the SoniClear main window as it is being transcribed, you will see a popup on the screen when it completes, and the transcript will be automatically downloaded when it is finished.
7. Use Export Note Features to Save as a File
- Use the File drop-down menu to select "Export Notes":

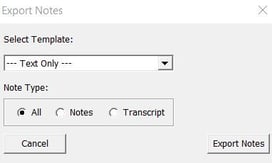
Output Format
There are a number of export formatting options which include various combinations of text, speaker ID, elapsed time, clock time, and detail field information for each note entry.The default selection is "Text Only" which exports the note information in a plain text file with corresponding elapsed and clock timestamps.
Additional options export the notes into a DOC file that is compatible with Microsoft Word. For example, Option 1, "Word - Text Only", is popular for end users who only want to export the summary for creating meeting minutes. Option 2, "Word - Speaker - Text", is popular for uses who need to see speaker identifications displayed next to the paragraphs of text.

Note Type
- Selecting All will include both notes you have entered into SoniClear and the full transcript. This is the default.
- Selecting Notes will include just notes you have entered.
- Selecting Transcript will include just the transcript.
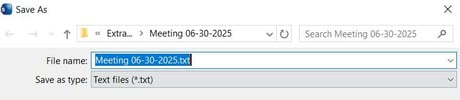
Click Export Notes
After selecting the desired options, click the Export Notes button. You will be prompted for where to store the transcript file. By default, this is the recording folder for the transcribed file. You can change the folder location in this dialog.
8. Edit Minutes and Transcripts in Microsoft Word
Use your Windows File Explorer or Microsoft Word to locate and open the exported notes file for editing.
Additional Support
To learn more, please refer to the SoniClear Transcriber Pro Manual.
If additional support is required regarding any feature of SoniClear please use the Support Request Form.